Let’s keep the celebration going this week. This year I seen and heard so many fireworks in our rural area that can give the cities a run for their money. All without the crowds, traffic, and no sitting on the ground. Two of our granddaughters were there for 1 night of them and the 3 year old ohhhh’d and ahhhh’d at every one. That’s what makes the fireworks so fun. Seeing them through the eyes of a child.

Let’s get to the crafting part of this blog. I picked up this cabinet at the local thrift store. The paint was thick and rubbery like, something I knew would take more prep time but the bones of the cabinet were good and the smaller size is something many people look for when they have a small bedroom, a pretty sunroom or kids room that needs a place for their books.
I failed to take a photo of the cabinet before I started working on it. I hope to get better at that, I'm always in such a hurry to start the process of transforming the ugly into pretty again, trust me this thing was ugly.
The first thing you need to do is take off this old paint. If you leave it on you're just wasting your new paint and time because it will peel off eventually no matter how many layers of paint are on top of it. I tried paint stripper and that did the trick, but I ran out.... next up was Dollar Store Awesome which also can remove paint but mine was so diluted down that it wasn't working. So I sanded and peeled everything off until I got down to the bare wood. Whomever painted it blue the first time used some good chalk type paint but the white and green were nasty.

I cleaned my sander many times during this process to not gunk up the vents with the rubber-like pebbles that were coming off. When I could get ahold of a piece of the paint I would pull it off like a sunburn.... I wish it all would have all come off that well. Who doesn't find joy in peeling sunburn?

We're finally ready to start painting, DIY Paint can go over most all surfaces but when it's gross peeling paint it's better to do the prep. No paint can stop this from happening.

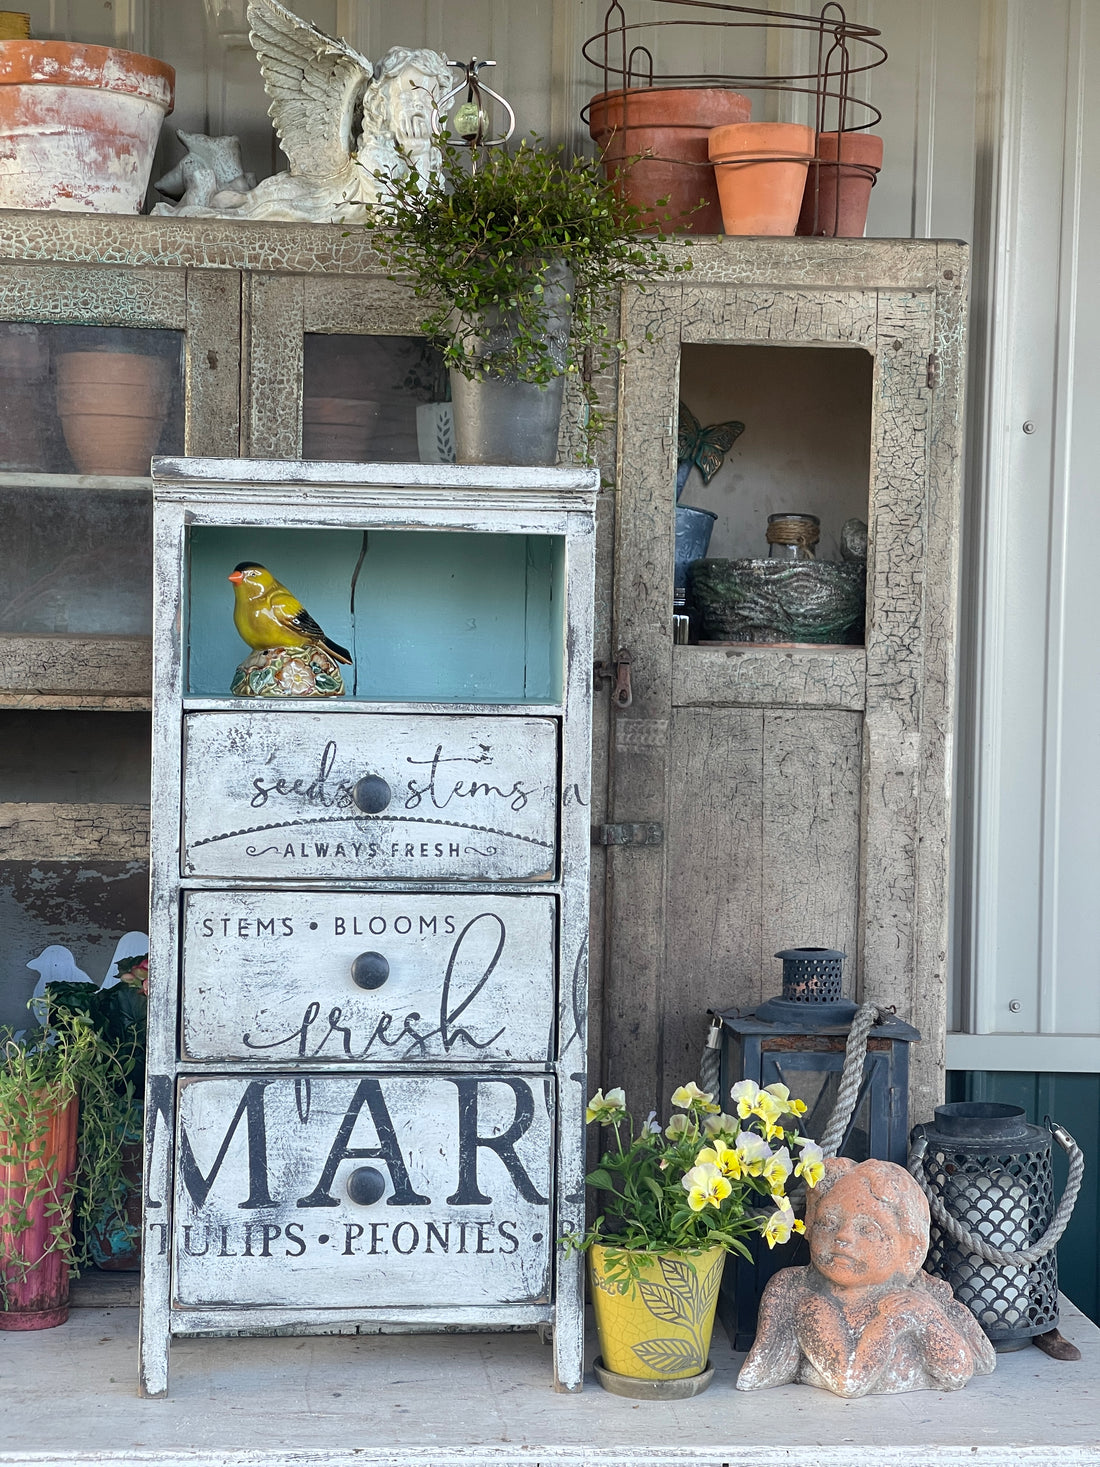
A product I like to use when I have a tough surface to paint is Saltwash. Saltwash is a paint additive that will give you a textured finish and also dries harder than just paint. The textured finish you can achieve with this mixture will help to cover up the imperfections of this cabinet and give me some nice grudge like I'm looking for. Here is the entire cabinet painted in DIY Weathered Wood mixed with Saltwash for added texture. This is your first look at the entire cabinet so you can see how good the bones are on the cabinet and the functional size of it. (Besides the large crack in the back it's in really good shape, adds character don't you think?) You can tell this is a homemade cabinet which makes it even more fun to give it new life.

Here is a closeup of the texture you can achieve with the added Saltwash into DIY Paint.
I have a confession..... I hadn't sanded the sides of the drawer at this point and I also didn't remove the knobs. I sanded the fronts of the drawers and the paint wasn't peeling off like the sides. I was planning to paint the knobs the same colors at the base and the sides were going to be a different color so like I said earlier I'm always in a rush to make something pretty, but I should have done a bit more prep. When I removed the knobs the sheets of sunburn paint came off with them and took off my new layer of Weathered Wood leaving an ugly thick paint chunks behind. Well guess what.... I sanded the drawer fronts down to the bare wood and the sides got sanded and peeled also at this point. The cabinet is now down to the bare wood in all the places. This process took a couple hours.... furniture painting is not for everyone, it's a lot of work.

My vision for this cabinet was to make it look like an old sign. Watch this YouTube for how I make old garden signs. I like the white signs with black lettering, so I added a layer of DIY Beadboard to the entire visual surface. The Beadboard was in a 16 oz can which many of you shy away from due to the paint getting in the ridges of the can and causing rust and the lid not to close.
I have a TIP for you. It's best to pour your DIY Paint out into something else while dipping your brush in it. The paint is made of only 9 ingredients which are all natural. Contaminating the paint can make it stink, get watery, separate, chunky.... all kinds of things. You don't want that but you also don't want a messy paint can. Place 2 pieces of painters tape on the edge of your can and cut/fold into a point. The paint should be covering ALL the ridges of the can. Pour the paint onto a plate, wipe off tape with your DIY Brush..... This is The Smoothie which laid this paint on with ease. When you're done with the paint, peel off the tape and your can ridges are paint free.

I didn't even make sure I had good coverage since I wanted the grudge look. But I also wanted solid coverage of the white paint where the white paint was so it took 2 coats in some areas.

Here is another close up of the texture the Saltwash has when you add another contrasting color on top. Here you can see that my sanding paid off, otherwise there was ripped sunburn paint around the knob area that you would be seeing also.

Okay we're finally getting to the good stuff. I have a few stencils from WallCutz in different styles and sizes so I decided to use them in a haphazardly way to fill the cabinet with an old signage look. I used DIY Black Velvet for the stenciling along with the 1" JRV Stenciling Brush. I've done a lot of stenciling in my days but these brushes are the best, they make the job so easy.

When stenciling there is always gaps between your letters making it look like a stencil. They look like this. You either don't mind them or like me and have to fix it.

I use a small liner brush with the same color paint as the stencil and fill in all the gaps making them one solid letter. I think it looks higher end quality than the gaps from the stencil but again it's purely your choice.
No gaps.

The stenciling is crisp and dark and perfect..... just the way I don't like it. I'm trying to achieve aged signs so out comes the sander to rough up the white paint and the stencil to make them look not so new. The Weathered Wood will be popping through a bit more now.

It's beginning to look like I wanted it to. I added clear DIY Wax to seal up the paint and then added some Dark Wax to give it a bit more grudge. It looks old and well used now. Much better than the old sunburn green paint.

You may ask... how do you know what to do with a piece? I just think of the function this cabinet will provide and where do I think it could go. This piece I could see sitting in a screened in porch next to a comfy chair with a few books placed in the drawers for some light summer reading. A small lamp on the top with a potted wire vine and of course a bird figurine in the top opening.

I am recording a YouTube video (coming soon) of the process so make sure you jump over to my channel and subscribe so you don't miss anything. The Painted Photographer I painted the insides of the drawers and the top shelf with DIY's Cottage Color in Ameraucana. This is a 1 step paint so there was no sealing I had to do within the drawers, on sides of drawers and in the top opening, it covered in 2 coats. You can see that pop of color in the top opening, not to bold but yet pretty. Here is the one side with the stencil going the other way. It starts at the bottom and flows over the top. The front stencil wraps around the other side.

If you've made it this far.... thank you. I always think these blogs are going to be short little updates with a few tips for you and then I can't stop. One more close up of the side with my yellow pansies poking out.

Please drop me a comment if you enjoyed this blog, I can't figure out how to reply to the comments but trust me I read every one of them and I'm so thankful for all of you.
If you'd like to purchase any of the products shown here or other DIY products please head over to my website at The Painted Photographer and I'll ship them right to your front door. If you're local head to Fourmens Farm Home in Medford, WI where I sell all my products.
Follow me on Facebook where I post daily updates and also a weekly live painting. The Painted Photographer Facebook Page
Until next time............ Happy Painting
5 comments
Hi Connie. This is lovely. Oh how I wish I had the vision you do, way back when… I shake my head at all the new life that could’ve been given to pieces, but were ultimately thrown out or given away. Now that I’m retired, I see things differently. I’m not so quick to throw away or donate. However, I think it annoys my husband…haha… he doesn’t appreciate my new love for painting crap. He’s still working in a very tough profession (corrections, what I recently retired from)… but, I’m certain when he retires, he’ll find an outlet or hobby that inspires him as well…probably auto mechanics? No thanks haha…I’d rather have paint all over my hands than grime & motor oil. At any rate…your art and tutorials are extremely inspiring to me. Although my attempts at reviving furniture aren’t even close to how beautiful your art is…doing it brings me PEACE. And I’m thankful for you sharing your talent on YT (where I found you cuz I don’t have FB or IG) , and also here on your blog. Thank you ☺️
You did an amazing job, Connie! I love the layout of your wording.
That piece would be perfect in my bathroom! Love it
Love it. So fun I would definitely use it on my covered patio by the pool.
I love your vision for the piece! It can be used in so many places. Thanks for sharing!